How to fix common label application problems
A label might look great on the roll, but if it doesn’t apply to your product’s container properly, then it won’t look good on the shelf, it won’t attract the attention of customers and it won’t drive sales.
If you’re experiencing label application problems, you can likely trace it back to one of five things:
- 1. The size of the label. If your label is too big for your container — or not designed for a curve or taper — then it can flag or bulge. To figure out which label size is right for your product, read this article.
- 2. The container itself. Discount containers often have noticeable seams and surface irregularities which can make it hard for the label to apply correctly. And tube labels come with their own set of application challenges — click here for advice on tube label application specifically. But regardless of the type of container, you need to make sure it’s dry and clean prior to application.
- 3. The label material. Using a label facestock that’s incompatible with your container material (e.g., glass or plastic, etc.) and type (e.g., squeezable tubes or rigid bottles) can make your label prone to tearing and wrinkling. It’s a good idea to test your label materials prior to ordering. Learn more about label material testing here.
- 4. The label adhesive. If you use an adhesive that isn’t designed for your product (application temperature, service conditions, container material, etc.), it can cause labels to fail during application or use.
- 5. The application environment. The temperature, humidity and even the application method (by hand or by machine) can affect how well your label adheres to your container.
This is why your label printer asks you so many questions before designing your label. What is your container like? Are you applying labels by hand or by machine? What is the temperature of the facility where your labels will be applied? They’ll use your answers to select the best label material, adhesive and printing options available when you place your order.
But even with all these precautions, label application problems can still happen. We’ll first walk through how to prevent label application problems, and then we’ll offer tips to fix four of the most common issues.
Preventing label application problems
If issues do arise with your custom-labeled products, the following steps will help determine the cause of the problem:
Inspect your labels before application
Before applying labels, be sure to inspect the label liner for die cut-through, label curling or a torn release liner. Regardless of whether you apply your labels by machine or by hand, damage to the label liner or labels that pull away from the liner can cause problems during application.
Also be on the lookout for adhesive that is either too aggressive (is difficult to remove from the liner) or not aggressive enough (easily pops off or slides around on the liner or container once applied). Adhesive problems are rare with advances in technology, but sometimes they do happen.
Double-check your containers
The surface of your container should be clean and dry and free of debris and oils prior to label application. Containers that have been handled with bare hands are often the culprit when labels fail.
Discount containers may have pronounced seams or uneven surfaces that affect label application. Plastic and glass bottles and containers can be inconsistently formed or asymmetrical, causing some labels to fail.
If you are using a plastic container, it is good to know the type of plastic. Some adhesives and plastics “disagree,” and this can cause the labels to lift off of the container.
Consider your facility’s environment
Label application problems are often caused by environmental conditions — namely temperature and humidity. If possible, apply your labels only in dry, room-temperature conditions. Of course, it’s not always possible to avoid extreme temperatures or humidity — such as in winter, summer and in cold warehouses.
Tips for applying labels in hot and humid conditions:
With the final design in hand, our team was looped in to discuss production, deliberating questions like:
- Store your labels on lower shelves. Heat rises, and high shelves can be up to 20 to 30° F higher than those near the ground.
- Keep your labels in airtight plastic bags to prevent humidity from ruining your labels.
- Never store your rolls flat on the face of the label. Instead, put them on a rack or orient the roll so it stands up vertically. This prevents labels from sliding on the liner.
Tips for applying labels in damp or cold conditions:
- Bring the contents of your container to room temperature prior to labeling.
- Store your labels and containers at room temperature, if possible. If you must apply or store labels at lower temperatures, consider switching to a cold-temp adhesive.
- Double-check that bottles and containers are dry and clean prior to application.
Identifying and fixing 4 of the most common label application problems
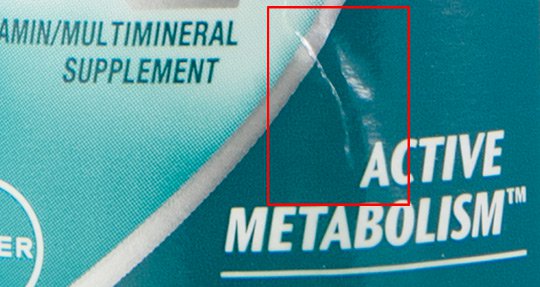
1. Label wrinkling
This is when folds or ridges form in your labels after application. There are a number of reasons labels wrinkle, but the most common is using the wrong material for the container. It is very important to let your label printer know if your container is glass or plastic, squeezable or rigid. Improper application or irregularities in your container might also cause wrinkling.
How to keep labels from wrinkling:
- Switch containers. Using a higher quality container with fewer irregularities (e.g., pronounced seams and surface inconsistencies).
- Switch facestocks. Double check with your label printer that your container type (e.g., squeezable or rigid, glass or plastic) is compatible with your label facestock.
2. Label tearing
Many labels are prone to tearing if you reposition them. If you need to move labels after application, let your label printer know. They can specify repositionable label adhesives, which take longer to fully set on your container and allow you to make small adjustments without tearing your label. And they can provide more durable label materials, including vinyl and polyester films.
How to keep labels from tearing:
- Use a repositionable adhesive. Make sure you’re using the right adhesive — if you need to be able to remove and re-apply your label after application, use a repositionable label adhesive.
- Use a tear-resistant facestock. Use a more durable facestock such as vinyl or polyester film instead of paper.
3. Label flagging
Flagging refers to bulges that can form along the edge of labels. This occurs when your label is too large for your container or if it isn’t the right shape for a curved or irregular container. Your label printer can help you design a custom label that is the right size and shape for your container. Working with your printer to ensure the correct material has been specified for your container can also reduce the chance of flagging labels.
How to keep labels from flagging:
- Size your label appropriately. Work with your label supplier to ensure your label is the right size and shape for your container.
- Check the strength of your adhesive. Make sure your label adhesive is strong enough to fit around your container, especially if your container has a tight radius.
- Look at your material. Talk to your label printer about the facestock you’re using. Switching materials could fix the problem.
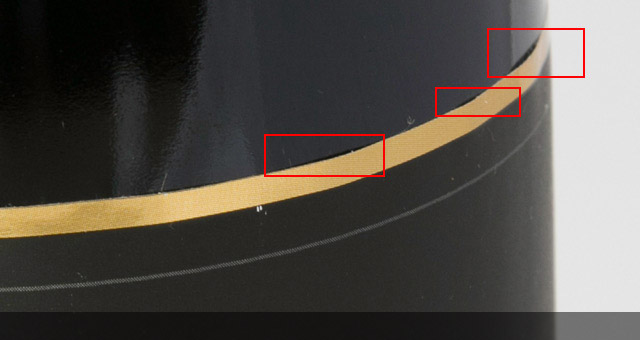
4. Labels peeling or curling
This happens when labels are applied in cold environments, or when your bottles are damp, dirty or greasy. This can also happen if you don’t allow enough time for your label adhesive to set. Making sure your labels have enough time to properly set up and adhere to the bottle before they are refrigerated (typically 24 to 48 hours) can help prevent this.
How to keep labels from peeling and curling:
- Prepare the surface of your container. Make sure your containers are clean and dry prior to label application.
- Double-check that your label is designed to apply correctly in your facility’s conditions. If, for example, you apply your labels in a cold warehouse, you will need a cold-temperature label adhesive.
- Let your labels set. Give your label adhesives the appropriate time to set before refrigerating or shipping them — often 24 to 48 hours, although some adhesives are designed to set in as little as two hours.
As an extra precaution against label application problems, you may want to order blank labels in the specified size, material and adhesive before placing your first order. This way you can test how the label interacts with your container — and avoid costly label application problems down the line.
If you tell us about your product, container and label vision, we can send you a few samples to test out on your container. Reach out today and let’s get started.